Mind Map
An interactive node canvas for brainstorming characters, story worlds, themes, and plot ideas — before you commit anything to a structure or a page.
Overview
What the Mind Map panel does and when to use it.
The Mind Map panel gives you a free-form visual workspace where ideas live as coloured nodes and relationships between them live as connecting lines. Unlike the Beat Sheet or the Treatment, there is no imposed order here — you are free to place ideas anywhere on the canvas and connect them in any way that makes creative sense to you.
Mind mapping is most useful at the very beginning of a project, when you are exploring characters, themes, and worlds without yet knowing the shape of your story. It is also useful mid-project when you are trying to untangle a complex subplot or understand how a character's arc relates to the plot.
Free Placement
Nodes can be placed and moved anywhere on an infinite canvas. There is no grid or snap-to-align constraint.
Node Connections
Draw lines between any two nodes to show a relationship — cause and effect, character bond, thematic link, or narrative dependency.
Colour Coding
Each node can be given its own colour. Use colour to distinguish character types, plot threads, or thematic layers.
Export to Other Panels
Send all nodes directly to the Beat Sheet or the Writers Room with a single click.
The Canvas Interface
Understanding the toolbar and navigating the canvas.
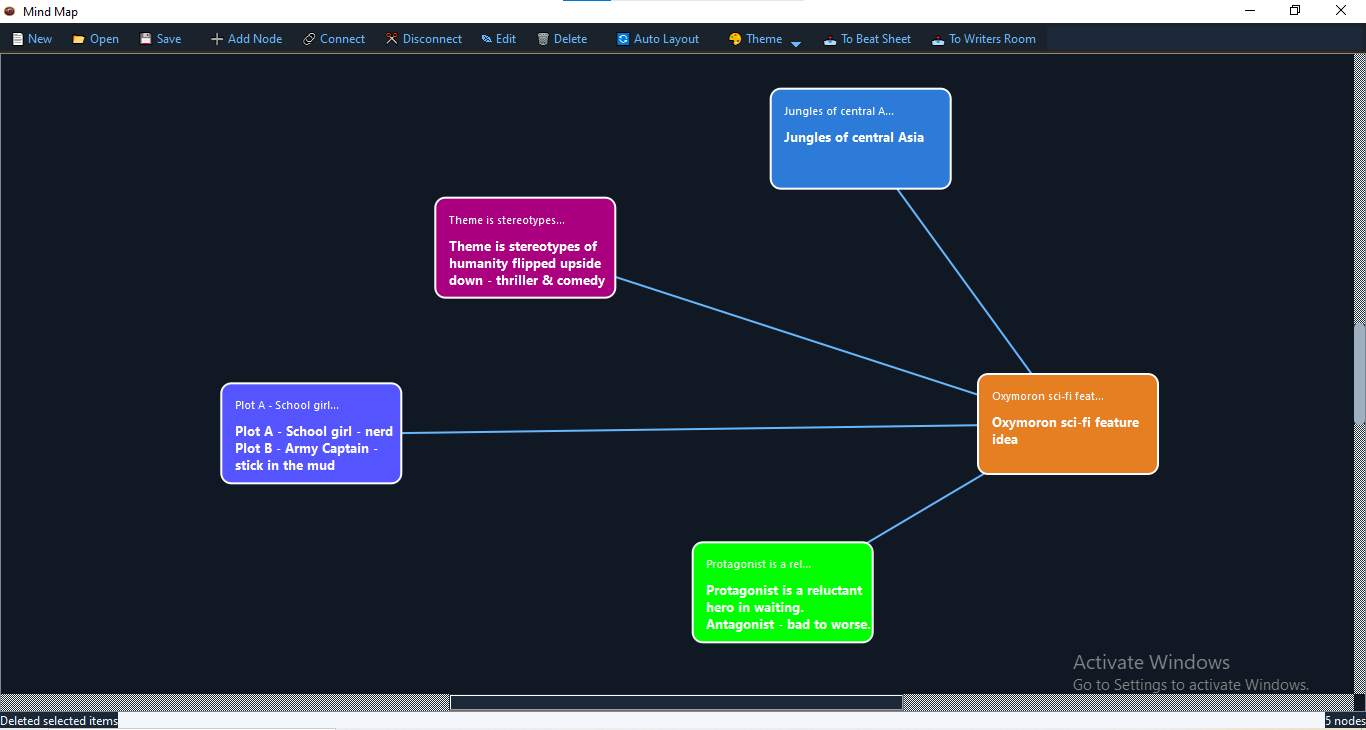
Toolbar buttons
The toolbar at the top of the panel contains every action you need.
| Button | What it does |
|---|---|
| 📄 New | Creates a blank map, discarding unsaved changes. |
| 📂 Open | Opens a saved .mindmap file from your computer. |
| 💾 Save | Saves the current map to a .mindmap file. If the file has not been saved before, a Save As dialog appears. |
| ➕ Add Node | Adds a new node near the centre of the current viewport. |
| 🔗 Connect | Enters Connect mode. Click one node, then click a second node to draw a line between them. |
| ✂️ Disconnect | Enters Disconnect mode. Click any connection line to remove it. |
| ✎ Edit | Opens the Edit Node dialog for the currently selected node. |
| 🗑 Delete | Deletes all selected nodes and their connections. A confirmation dialog appears first. |
| 🔄 Auto Layout | Arranges all nodes evenly in a circle around the canvas centre. |
| 🎨 Theme | Opens the theme menu to switch between light, dark, and system colour schemes. |
| 📤 To Beat Sheet | Sends all nodes to the Beat Sheet as individual beat cards. |
| 📤 To Writers Room | Sends all node titles and notes to the Writers Room script view. |
Navigating the canvas
- Pan — click and drag on any empty area of the canvas.
- Zoom — scroll the mouse wheel up to zoom in, down to zoom out. The zoom is centred on the pointer position.
- Middle-click pan — hold the middle mouse button and drag for a quick pan without leaving the current mode.
- Select a node — left-click on it. The node gains a dashed blue highlight.
- Move a node — click and drag it to a new position. Any connection lines move with it.
Double-click anywhere on the empty canvas to instantly add a new node at that position. This is faster than using the toolbar button and places the node exactly where you want it.
Working with Nodes
Creating, editing, and organising nodes.
What a node contains
Each node stores three pieces of information:
- Text — the label visible on the canvas. Keep it short: a name, a concept, or a short phrase works best.
- Colour — a hex colour that fills the node background. Use colour deliberately to create visual categories.
- Notes — a longer freeform text field, hidden from the canvas view but saved with the node. Use it for backstory, research snippets, or ideas you are not ready to surface yet.
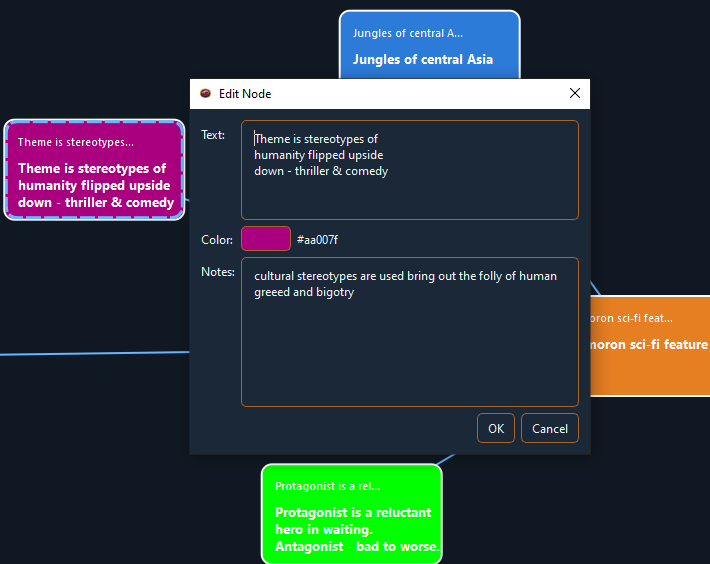
Editing a node
-
Double-click the node
This opens the Edit Node dialog directly.
-
Or select the node and click ✎ Edit in the toolbar
Both methods open the same dialog.
-
Update Text, Colour, or Notes
Click the colour swatch to open the system colour picker. The canvas preview updates when you click OK.
You can also edit a node's text directly on the canvas by clicking once to select it, then clicking again inside the text area. This is useful for quick renames without opening the full dialog.
Deleting nodes
Select one or more nodes (hold Ctrl or Cmd and click to select multiple) then click 🗑 Delete in the toolbar. A confirmation dialog will ask you to confirm. Deleting a node also removes all its connections.
Connections
Drawing and removing lines between nodes.
Drawing a connection
-
Click 🔗 Connect in the toolbar
The toolbar button turns blue and the cursor changes to a crosshair. The status bar at the bottom of the panel shows guidance text.
-
Click the first node
It is highlighted to show it is the source of the connection.
-
Click the second node
A line is drawn between the centres of the two nodes. Connect mode then turns itself off automatically.
If you attempt to connect two nodes that are already connected, the status bar will show a "Nodes already connected" message and no duplicate line will be created.
Removing a connection
-
Click ✂️ Disconnect in the toolbar
The cursor changes to a crosshair.
-
Click the connection line you want to remove
The line disappears immediately. Disconnect mode turns itself off automatically.
Auto Layout
Clicking 🔄 Auto Layout arranges all nodes evenly around a circle centred on the canvas origin. This is useful when your canvas has become cluttered and you want a clean starting point for repositioning nodes manually.
Auto Layout works best when you have between 3 and 15 nodes. With very large maps the circle becomes too large to read comfortably — in that case, use manual placement after running Auto Layout to bring related nodes closer together.
The canvas centres on the origin point automatically after an Auto Layout so all nodes are immediately in view.
Saving & Loading
Mind maps are saved as .mindmap files.
Saving your map
Click 💾 Save. If the map has never been saved before, a Save As dialog opens and asks where to save the file. On subsequent saves, the file is overwritten silently without a dialog. The status bar confirms the save with a message showing the filename.
The .mindmap file is plain JSON and contains all node positions, colours, notes, and connection data. You can open it in a text editor if you need to inspect or edit it outside Thenema Writer.
Opening a saved map
Click 📂 Open and select a .mindmap file. The current map is replaced entirely. If you have unsaved changes, save first — there is no automatic warning when opening a new file.
Starting fresh
Click 📄 New. A confirmation dialog appears asking whether to discard the current map. The new canvas starts with a set of sample nodes to give you a starting point.
Sending to Other Panels
The Mind Map can forward its content to two other panels in Thenema Writer. In both cases all nodes are sent — there is no per-node selection for export.
📤 To Beat Sheet
Each node becomes a separate beat card on the Beat Sheet. The node's text becomes the beat title and any notes stored in the node become the beat's notes field. Cards are placed in a grid layout on the board.
The Beat Sheet panel must be open before sending. If it is not open, Thenema Writer will open it automatically.
📤 To Writers Room
Node titles and any notes are formatted as a plain-text list and placed into the Writers Room script view. Each node title appears on its own line; notes appear indented in parentheses beneath it. This gives the Writers Room a starting outline of ideas to work from.
Use the Mind Map to freely brainstorm all your story ideas without structure. Once you have a set of nodes that feel like the shape of a story, send them to the Beat Sheet to begin organising them into acts. From the Beat Sheet you can send them onward to the Treatment and Writers Room.
Tips & Best Practices
Use colour as a language
Pick a small palette and stick to it. For example: orange for main characters, blue for plot events, green for themes, grey for locations. The Auto Layout circle makes colour patterns immediately visible at a glance.
Keep node labels short
A node label of more than five or six words becomes hard to read on the canvas. Move longer thoughts into the Notes field and keep the label as a headline.
Save often
Thenema Writer does not auto-save mind maps. Get into the habit of pressing 💾 Save after any significant change.
Use the Notes field for private ideas
Anything you put in a node's Notes field does not appear on the canvas. This makes it a good place for half-formed ideas, research quotes, or character details you are not ready to show collaborators.
Central node first
Start every map by placing one central concept — the story's core question or the protagonist's name — at the origin point. Everything else radiates outward from it. This gives your map a natural hierarchy even in free-form mode.