
Writers Room
A collaborative writing environment with live scene cards, script annotations, draft version history, and real-time peer-to-peer sessions — built for writing teams working on the same story at the same time.
Overview
What the Writers Room provides and how it fits in the workflow.
The Writers Room is the panel where a screenplay stops being a solo document and becomes a team conversation. It combines a script view on the left, a scrollable column of scene cards in the centre, and a live video/voice/chat session panel on the right — all in one window.
It receives content from every upstream panel — Mind Map, Skeleton, Synopsis, Beat Sheet, Treatment — and feeds its structured scene content forward to the Script Editor. Writing teams use it to read the script together, discuss individual scenes, pin annotations, snapshot drafts, and build beat breakdowns scene by scene.
Script View
An editable text field showing the full script or treatment outline. Clicking a scene card scrolls the script to that scene automatically.
Scene Cards
One card per scene, showing the heading, a preview of the first few lines, and any AI-generated dramatic beats. Drag to reorder scenes.
Annotations
Pin notes to any character position in the script. Annotations appear as coloured glyphs in the margin and are listed in a panel below the scene cards.
Draft History
Snapshot the script at any point in time. Restore any previous snapshot with one click — no work is ever permanently lost.
Live Sessions
Start or join a peer-to-peer writing session. Share a session code with co-writers on the same network to connect video, voice, and chat.
AI Beat Generation
Thenema Editor can analyse the text of any scene and suggest dramatic beats — key units of action and emotion within that scene. You decide which, if any, to use.
Panel Layout
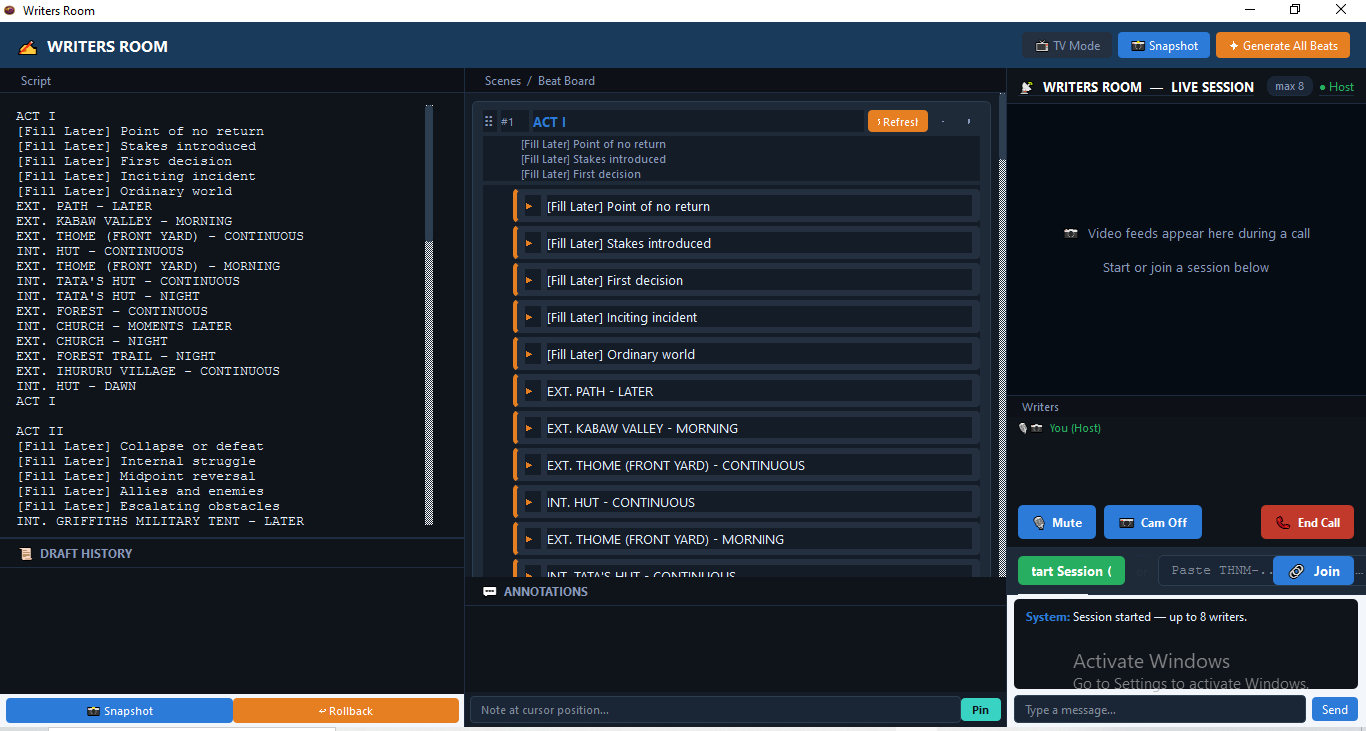
Left column — Script & Draft History
The left column is itself split into two sections. The upper section is the script view — the main editable text area. The lower section is the Draft History panel showing timestamped snapshots. Drag the horizontal splitter to resize them.
Centre column — Scene Cards & Annotations
The centre column contains a scrollable list of scene cards (upper area) and the Annotations list (lower area). Scene cards are generated automatically from the script text when content is loaded. The annotation list shows all pinned notes with their author and text.
Right column — Live Session
The right column is the live session panel. When no session is active, it shows the controls to start or join a session. During an active session it shows the video area, writer list, mic/camera controls, and chat.
Header bar
The header bar runs across the top and contains:
| Control | What it does |
|---|---|
| 📺 TV Mode | Groups scene cards by act/episode headers found in the script. |
| 📸 Snapshot | Takes a timestamped snapshot of the current script text and adds it to the Draft History. |
| ✦ Generate All Beats | Asks Thenema Editor to generate dramatic beats for every scene card simultaneously. |
Script View
The script view on the left is an editable text field. It accepts content sent from other panels (Skeleton, Synopsis, Beat Sheet, Treatment) and also accepts direct typing. It is not a screenplay formatter — that is the Script Editor panel's role. The Writers Room script view is a shared reading and discussion space.
Loading content
Content arrives in the script view in two ways: by being sent from another panel (via the respective panel's Send button), or by typing directly into the field. When content is loaded, Thenema Writer automatically parses it for scene headings (INT. / EXT.) and generates a scene card for each heading found.
Clicking scene cards to navigate
Clicking any scene card scrolls the script view to the beginning of that scene and moves the cursor there. This makes it easy to jump directly to a scene during discussion without scrolling manually.
Annotation margin
A thin strip to the right of the script text displays coloured ellipse glyphs — one per annotation. The vertical position of each glyph corresponds to the annotated line in the script. Click a glyph to see the annotation's author and content in a pop-up.
Scene Cards
One card per screenplay scene, parsed from the script text.
Each scene card shows the scene heading, a preview of the first three lines of the scene, the scene number, and any AI-generated beats (if the ✦ Beats button has been clicked for that card). Cards are generated automatically whenever the script text changes.
Card controls
| Control | What it does |
|---|---|
| ↩ Flip | Flips the card to show the full scene text in a scrollable read-only editor. |
| ▾ / ▸ Toggle | Collapses or expands the card's preview and beat section. |
| ✦ Beats | Asks Thenema Editor to generate dramatic beats for this specific scene. See the AI Beat Generation section below. |
Drag to reorder
Each card has a drag handle (⠿) in its top-left corner. Click and drag the handle to reorder cards. The new order is reflected in the scene list but does not modify the script text — it is a working view order for the writers room discussion, not a script edit.
Writer presence badges
During a live session, small coloured badges appear on scene cards showing which connected writers are currently viewing that scene. Each badge shows the writer's name and a typing indicator if they are actively editing.
TV Mode
Toggle 📺 TV Mode in the header bar to group scene cards by act or episode. When enabled, Thenema Writer looks for act headers in the script text (ACT ONE, ACT TWO, COLD OPEN, TEASER, TAG, CODA etc.) and groups the cards beneath collapsible section headers.
This is particularly useful when working on a multi-act television pilot or a procedural episode with a cold open and multiple acts. Click any section header to collapse or expand its cards.
Annotations
Annotations let any writer pin a note to a specific position in the script text. They appear as coloured glyphs in the margin bar and are listed with author, timestamp, and text in the Annotations panel below the scene cards.
Pinning an annotation
- Position the cursor in the script view
Click to place the cursor at the line or passage you want to annotate.
- Type your note in the input field in the Annotations panel
The input field is at the bottom of the Annotations list, labelled "Note at cursor position…"
- Click Pin
The annotation is saved and appears immediately as a glyph in the margin. The Annotations list updates to include the new note with your name and the current time.
Navigating to an annotation
Double-click any entry in the Annotations list to jump the script view cursor to the position of that annotation.
Removing an annotation
Click the glyph in the margin bar. A pop-up shows the annotation's content with an option to remove it. Removing an annotation also removes its entry from the Annotations list and its glyph from the margin.
Draft History
The Draft History panel (lower left) keeps a list of timestamped snapshots of the script text. Snapshots are created manually — they are not automatic.
Taking a snapshot
Click 📸 Snapshot in the header bar. A new entry appears in the Draft History list showing the time, your author name ("Me" by default), and the word count at the time of the snapshot.
Rolling back to a snapshot
- Click a snapshot in the list
Select the version you want to restore.
- Click ↩ Rollback
A confirmation dialog warns that rolling back will overwrite the current script text.
- Confirm
The script view is restored to the selected snapshot. Scene cards are regenerated from the restored text.
Take a snapshot before any significant restructuring or rewrite pass. Draft History is not saved to disk automatically — snapshots exist only for the current session. Save the script text to a file at the end of each session to preserve it permanently.
Live Session (Peer-to-Peer)
Connecting with co-writers in real time over a local network or VPN.
Live sessions use a peer-to-peer connection over your local area network (LAN) or a VPN. All participants must be on the same network. Live sessions do not route over the public internet. A maximum of eight writers (one host plus seven guests) can join a single session.
Starting a session (host)
- Click 🔑 Start Session (Host)
Thenema Writer starts a local signalling server and generates a unique session code in the format
THNM-word-word-word-xxxx@ip:port. - A dialog displays your session code
Copy the full code (including the
@ip:portsuffix) and share it with your co-writers over any communication channel. - The session is now active
Your name appears in the writer list as "You (Host)". The session remains active until you click 📞 End Call.
Joining a session (guest)
- Paste the full session code into the code field
The field is labelled "Paste THNM-... code to join…" in the session controls area.
- Click 🔗 Join
Thenema Writer connects to the host's signalling server using the IP address and port encoded in the code.
- You are connected
Your name appears in the writer list. The video area activates if you have a camera connected.
During a session
| Control | What it does |
|---|---|
| 🎙 Mute / 🔇 Unmute | Toggles your microphone on and off. All other participants see your mic status in the writer list. |
| 📷 Cam Off / Cam On | Toggles your camera on and off. Your video feed disappears from the video area for other participants. |
| 📞 End Call | Ends the session for you. The host ending the session terminates it for all participants. |
| Session Chat | Type a message and press Enter or click Send to send it to all participants in the session chat log. |
Thenema Editor — Scene Beat Generation
The beat generation feature reads your scene text and identifies the key dramatic beats already present within it. It surfaces what you have written, helps you see the structure of your own scene, and may suggest beats you have implied but not yet made explicit. It does not write new scenes or new dialogue for you.
Generating beats for a single scene
Click the ✦ Beats button on any scene card. Thenema Editor analyses the scene text (up to 1,500 characters) and returns a list of three to six dramatic beats — each one a short description of a unit of action or emotion within the scene. The beats appear as labelled chips below the scene card's preview text.
Clicking a beat to navigate
Click any beat chip to highlight the first matching passage in the script view. The highlighted text is visually distinguished in amber so you can immediately see which part of the scene corresponds to that beat.
Generating beats for all scenes
Click ✦ Generate All Beats in the header bar to request beat generation for every scene card simultaneously. This is useful for a first-pass analysis of a full script import, but note that it sends many requests at once — allow a moment for all cards to complete.
Beat generation requires the anthropic package to be installed and an active Thenema Editor subscription. If neither is present, the ✦ Beats button will show an error message when clicked.
How Panels Connect to the Writers Room
| Source Panel | What arrives |
|---|---|
| Mind Map | Node titles and notes as a plain-text list in the script view. Scene cards are generated from any lines that look like scene headings. |
| Screenplay Skeletons | The enriched outline text, loaded into the script view. Scene cards are generated for any act headers found. |
| Synopsis | The full synopsis text, placed into the script view as a starting outline. |
| Treatment | All non-empty act and episode tabs combined and placed into the script view. Act headings generate corresponding section groups. |
| Beat Sheet | Beats grouped by act, placed into the script view as a structured outline. Scene cards are generated for each beat title. |
| Script Editor | The Script Editor's export function sends the formatted script into the Writers Room script view, generating a scene card for every INT./EXT. heading. |
Tips & Best Practices
Use the Writers Room after the Beat Sheet, not before
The Writers Room works best when a story already has shape — when there are acts, scenes, and at least a skeleton of beats. Bring the Beat Sheet into it rather than starting from scratch here.
Snapshot at the start of every session
The first thing a writing team should do when opening the Writers Room is take a Snapshot. This creates a safe restoration point before any discussion-driven changes are made.
Use annotations instead of inline comments
Do not insert bracketed notes directly into the script text (e.g. [CHECK THIS]). Use the Annotations system instead. Annotations are separate from the text, clearly attributed to their author, and can be navigated and removed cleanly.
Keep the Live Session for structured passes
A Live Session is most productive when the team has a defined task: read the script aloud, discuss the second act, or work through the scene card order. Open-ended "let's see what happens" sessions tend to generate more chat than useful script changes.